
How To Cover Car Windows For Sleeping (2 Options)
I just bought a RAV4 and am prepping it for an epic road trip and car camping all across the western US.
I already have tinted windows, but I wanted to make some window coverings for added privacy and to completely block all the light (and heat) out. I also wanted something that could keep the interior of the car warm when temperatures start to drop in the fall.
These car window coverings are the perfect solution.
So here is exactly how to cover car windows for sleeping, step-by-step.
Preparing For Your DIY Car Window Covers
I kinda went into this window cover project and made a lot of silly mistakes along the way. Mistakes that cost me time and a few eye rolls.
For instance, I went to the fabric shop without measuring my car windows first. 🤦
Here are a few things I learned the hard way:
- Measure everything twice: Getting the exact size and shape of the car windows is crucial. This includes taking into account any curves or unique features of the windows. A slight miscalculation can lead to gaps, letting in light and compromising insulation.
- Carefully cut the Reflectix: Be very careful when cutting the Reflectix. It’s essential to stay as true to your template as possible for the best fit. Also, always cut on a safe and stable surface. This is the Reflectix I used.
- Ventilation: Remember that while Reflectix is great for insulation, it can also trap heat if used excessively. Make sure to consider ventilation in your van or car to prevent overheating. I like cracked windows covered with these mesh window coverings.
- Storage: Consider where you’ll store the covers when they’re not in use. They should be kept in a dry, clean area to avoid damage. Since the Reflectix is stiff, you won’t be able to bend it easily. You can just throw them on top of your sleeping area.
- Keep the bugs out: If you’ll be in a bug-prone area, consider using some window netting so that you can crack the window and remove one of these insulated panels. I use these mesh window coverings.
Step-By-Step Instructions For Making Car Window Covers
NOTE: All of this will be for my RAV4 XLE Hybrid. See my full RAV4 camping setup for more ideas!
Step 1: Create Templates Of Your Car Windows
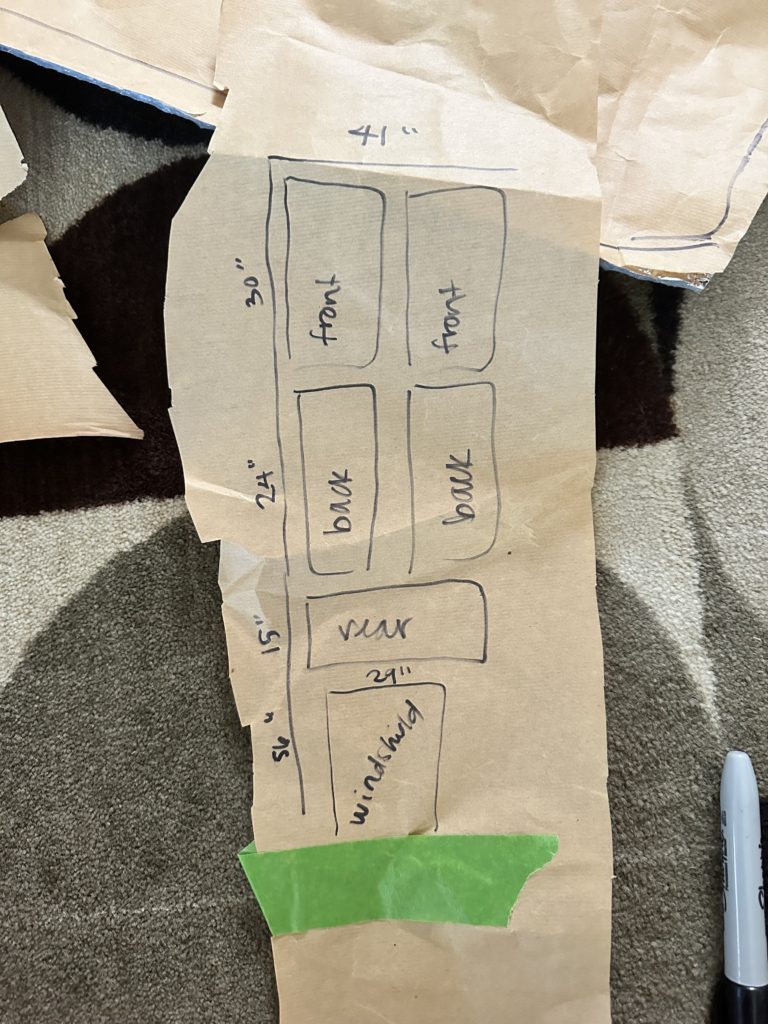
Go to your car and make paper templates of all the windows. If you have symmetric windows (like the two door and back side windows), you only need to make one template of each.
Note: You may choose to skip the front windshield, if you already have a cover for it.
You’re gonna need some cardboard or heavy paper, like poster board, to make the templates, along with a good marker or pen. You might want to grab a measuring tape too, just to double-check things.
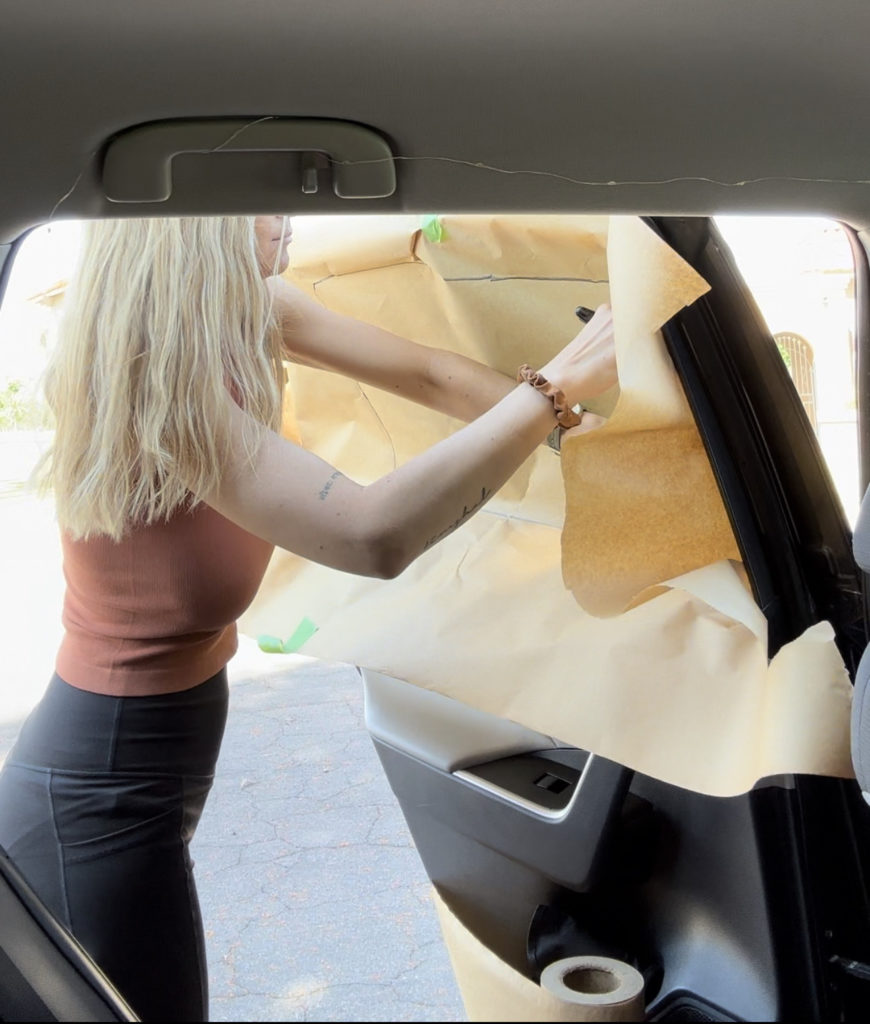
Alright, now go to the window you’re templating. Clean the surface quickly if it’s dusty, just to make sure your paper sticks properly. Trust me, it makes things easier.
Now, take your cardboard or paper and hold it up to the car window. You want to cover the entire surface you’re going to insulate. A bit of painter’s tape can help keep things steady. Start by pressing the paper against the window, and trace the edges with your marker. You can keep the paper in place with some tape if it’s easier. Make sure to follow any curves or corners as closely as possible – the more accurate, the better!
Okay, you’ve got your shape traced out. Before you start cutting, check the measurements with your tape. It’s a classic saying for a reason – measure twice, cut once. If everything looks good, grab your scissors and start cutting along the lines you’ve traced.
Now, take your newly cut template and hold it up to the window. Does it cover everything perfectly? If it’s a little off, no worries – just mark where you need to adjust, and trim it down.
This part doesn’t need to be super precise because remember – you’ll be cutting the Reflectix a smidge larger than your template. That extra bit of material is what’s going to help your sun shades stay put.
So don’t stress if it’s not perfect, we’re making progress and that’s what counts! Onward and upward!
Step 2: Get Your Materials
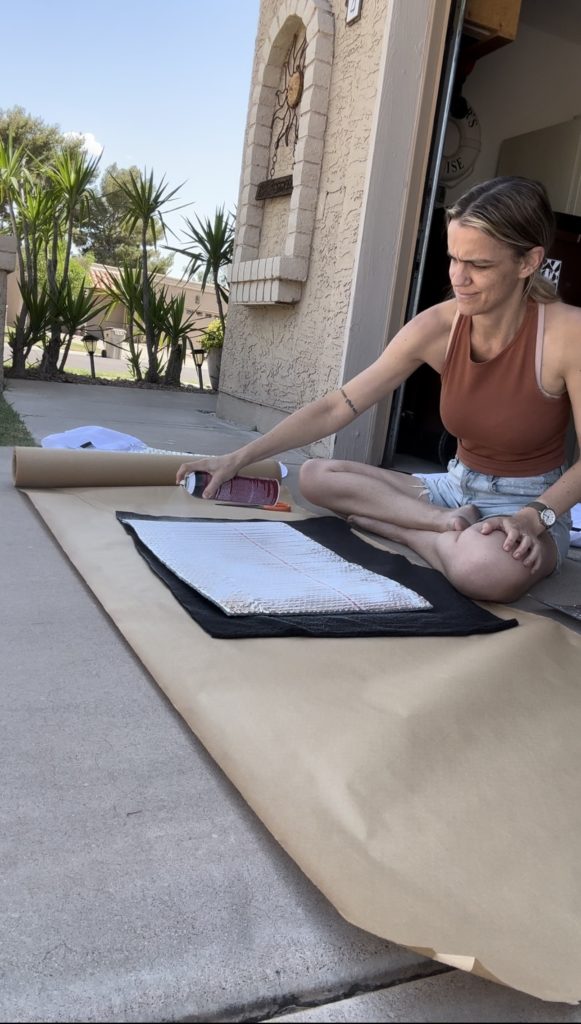
Purchase the necessary materials: Reflectix, fabric (like fleece or felt, one darker for the outward facing side and one lighter for the inside) and 3M’s Super 77 spray adhesive. Make sure to buy enough fabric to cover all the Reflectix pieces.
Step 3: Cut the Reflectix
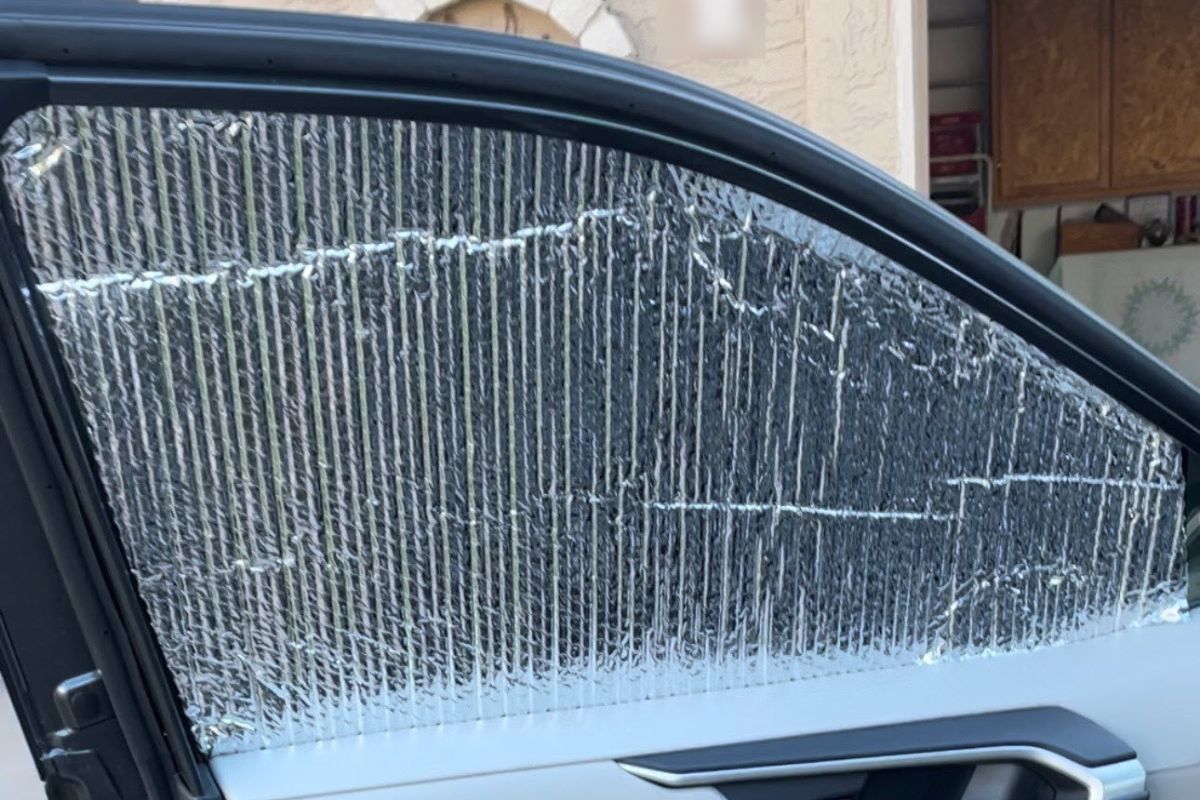
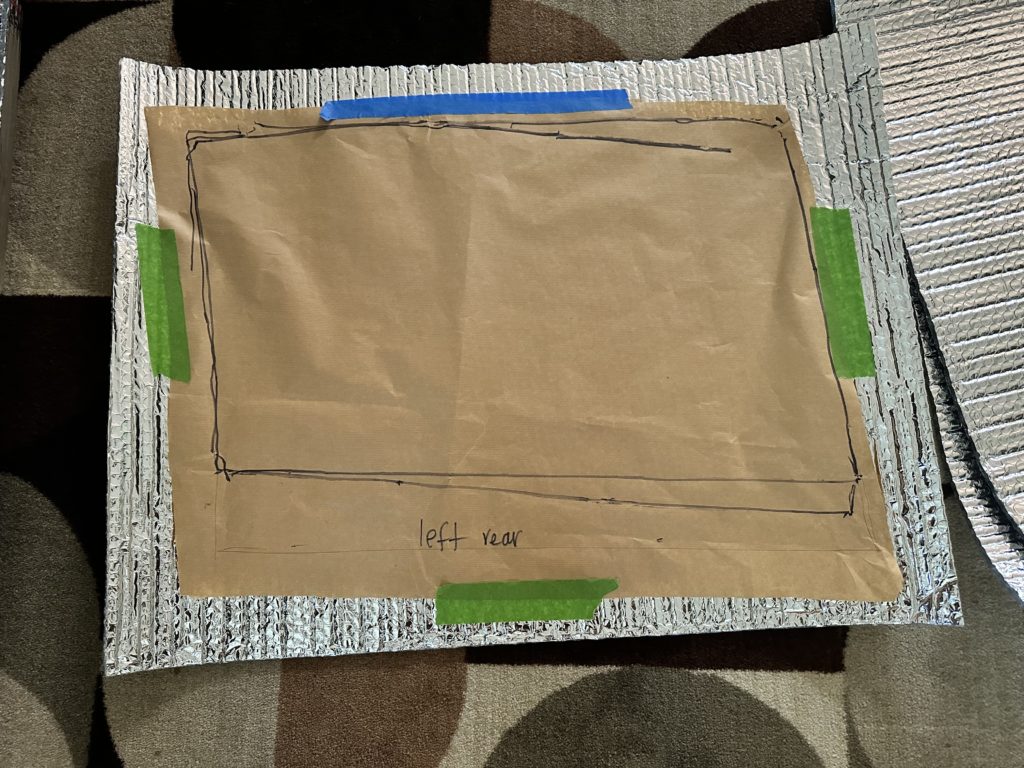
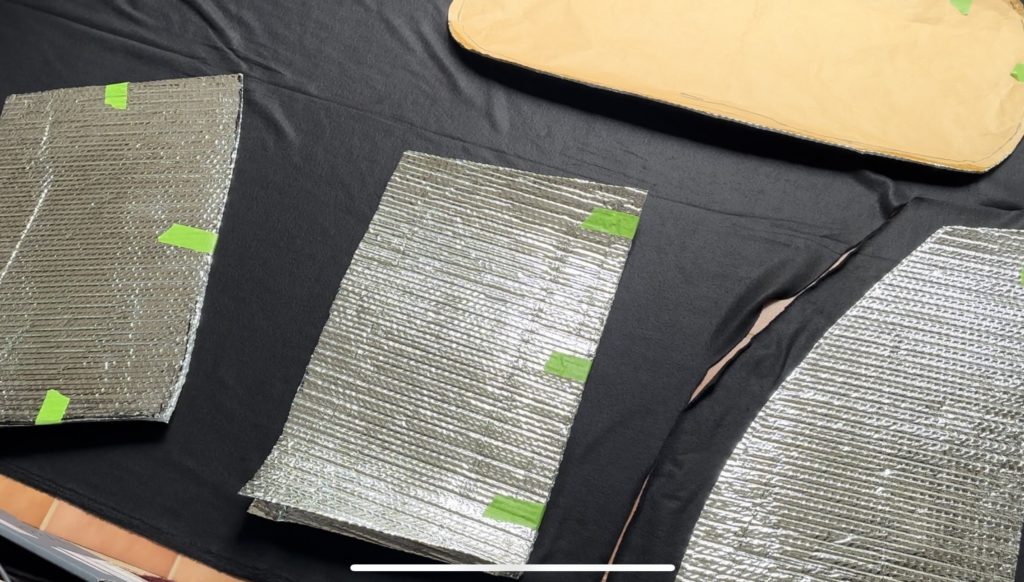
Using the paper templates, cut two panels of Reflectix per window. Make sure the creases in the Reflectix are perpendicular in each panel for added rigidity.
Reflectix is designed to reflect radiant heat, not direct sunlight, which is great when you’re camping and trying to keep your van cool in the summer. The sun’s heat comes down, hits the Reflectix, and boom! It gets bounced back out.
Now, when we double up on the Reflectix, we’re actually creating a kind of insulation sandwich. And the key ingredient in this sandwich? Air. Air is a fantastic insulator because it’s bad at transferring heat. That’s why you see it used in everything from double-paned windows to thermos flasks.
With two layers of Reflectix, you’ve got an air gap in the middle. This air gap serves as an extra barrier for heat transfer, making it harder for the outside heat to get in and your inside heat to get out. In the summer, it keeps your van cooler, and in the winter, it keeps you toastier. It’s a win-win!
So while it might seem like a bit of extra work to double up, trust me, it’s worth it. Your future self, chilling in a perfectly temperature-controlled car at night, will thank you!
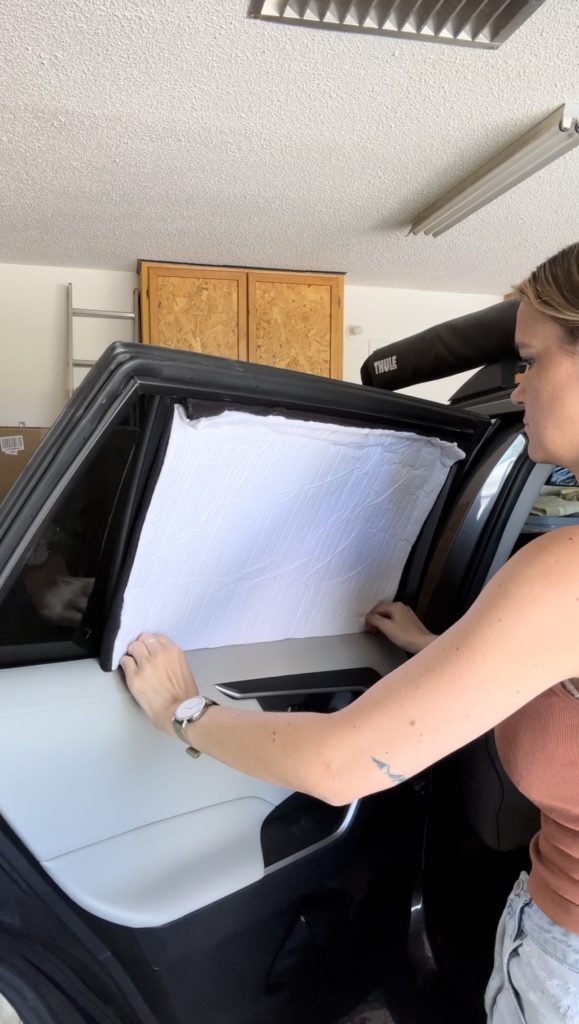
Step 4: Dry Fit the Reflectix Cutouts
Take all the cutouts to your car for a dry fit. Reshape them as needed to fit the vehicle’s windows well, keeping in mind that the fabric will add some interference between the covers and the window frames. Note which covers are in direct contact with a steel door frame; on these sides you can add magnets to hold the covers in place.

You can stop here and I did half way through covering the Reflectix. I was worried it’d get too hot so left the plain Reflectix on the rest of the windows. Having camped in the rain and chilly weather now, though, I regret that decision. It’s up to you if you want to continue!
STEPS 5-8 ARE OPTIONAL
Step 5: Cut the Fabric
Using the Reflectix panels, trace the shapes onto the fabric, leaving about a 1-inch allowance to be wrapped around the edge of the Reflectix.
If you choose to make little pillow cases out of the fabric, then add 2 inches to the perimeter.
Cut the fabric.
Step 6: Attach Fabric to Reflectix OR Make Removable Reflectix Cases
There are two ways to do this, both of which will work fine (I think!). I’m making little pillowcases for these so that I can remove and wash if needed.
If Attaching With Adhesive Spray
Use the Super 77 spray adhesive to attach the fabric to each separate piece of Reflectix. Be careful to note which panel of each pair goes on the outside and which goes on the inside.
If Sewing Window Cover Cases With Sewing Machine
Alright, for this process you’re going to need your Reflectix cut-outs, your black and white fabric, some pins, a pair of fabric scissors, and of course, your trusty sewing machine.
Take your Reflectix template and lay it on the fabric. You want to cut pieces that are slightly larger than the Reflectix because you’ll need some extra fabric for your seams. I recommend adding about an inch to each side.
Remember, you’re making a two-sided cover, so you’ll need to cut a piece of black fabric and a piece of white fabric for each window.
Now, place your fabric pieces right sides together (that means the side you want to face outwards when you’re done should be facing each other). Use your pins to hold the fabric pieces together around the edges. Make sure to align them properly, so you have an even seam all the way around.
Okay, it’s time to get that sewing machine humming. Start sewing around the edges of your fabric, leaving about a 1-inch seam allowance. Oh, and don’t forget to leave one side open – you’ll need this to insert the Reflectix!
Once you’re done sewing, it’s time to put your double-layer of Reflectix inside the case. Carefully slide the Reflectix cut-out into the open side of your fabric case. It should fit snugly if you’ve measured correctly.
Now you just need to sew the open side closed. If you want to make it neat, you can fold the fabric inward to create a clean seam, then sew the rest of it shut.
And there you go! You’ve created your first dual-sided, no-adhesive window insulation. Now you just need to repeat the same process for all your windows.
Step 7: Join the Halves
With the fabric attached on both halves of each panel, use the spray adhesive to join the halves, making sure all the edges line up. Let the adhesive dry a little before pushing the panels together.
Step 8: Test the Covers
Put all the covers in the windows of your vehicle and make sure they fit well and let in the desired amount of air. Make sure they are easy to setup and take down.
Closing Thoughts
How’d your window covers turn out? I’d say my window coverings turned out pretty good if-I-do-say-so-myself. I’ll be car camping for the next few months, so I’ll update this blog post to report back how these window covers do in different climates and scenarios.


3 Comments